Monday, August 4, 2025

Dehydrating beef


Dehydrating Meat

FROM https://www.backpackingchef.com/dehydrating-meat.html#dehydratinggroundbeef


There are a few tricks when dehydrating meat for backpacking meals that greatly improve its tenderness when you rehydrate it on the trail.

Before we get into how to dehydrate meat, let’s cover a question I often receive about dehydrating meat...

How Long will Dried Meat Keep?

Freezing dried meat will preserve it for several years.

Vacuum sealing the dried meat prior to freezing prevents freezer burn and freezing stops the clock for all biological processes.

For use and storage less than a year, freezing is not required, but is still beneficial before you assemble your meals – provided you take reasonable care in drying and packing it.

Dry only lean meats and blot off any oil during the drying process. It is the fat in meat that can turn rancid as it reacts over time with oxygen. Heat and light accelerate oxidation, so store in a cupboard away from heat.

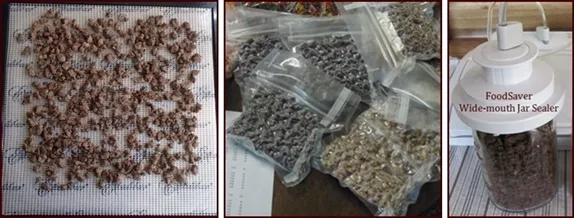
As long as the meat you dry is low-fat, it will keep well in jars with oxygen absorbers or in jars that are vacuum sealed with the FoodSaver accessory. I have stored dehydrated meat for up to a year in jars. If you want to go longer than a year, or if you just want peace of mind, you can vacuum seal the dried meat in vacuum bags, and place the meat in the freezer. When taking dried food out of the freezer, allow the food to return to room temperature before opening the bag. Otherwise, condensation may form on the food.

Storing Dehydrated Meat

See the section on vacuum sealing food for more information about best practices for storing dried meat.

Dehydrating Meat in a Food Dehydrator

Many food dehydrator user guides and books include recipes for dehydrating raw meat, such as beef jerky, by placing the meat directly into the dehydrator without precooking it.

This is not safe.

Even if the temperature setting of your food dehydrator goes up to 165°F (74°C), the temperature of the meat inside the dehydrator may not reach that temperature, due to evaporative cooling. Pathogens, such as Salmonella and E. coli, may survive the drying process.

The U.S. Department of Agriculture Food Safety & Inspection Service recommends cooking beef to an internal temperature of 160°F (72°C) and poultry to 165°F (74°C), before drying it in a home food dehydrator.

See USDA Article: Jerky and Food Safety.

All Backpacking Chef instructions and recipes specify precooking meat before drying it.

Dehydrating Ground Beef

Dehydrating Meat: The Secret to Dehydrating Ground Beef is to add Breadcrumbs.

Breadcrumbs

Backpackers often call dehydrated ground beef “gravel” because it doesn’t rehydrate well. Solve this problem by adding breadcrumbs to the meat before cooking it. Breadcrumbs allow more liquid to penetrate the dried meat when you rehydrate it, so it turns out tender every time.

Make breadcrumbs by dehydrating bread slices for two to three hours and then grinding the dried bread in a food processor.

Gluten-Free Alternatives:

If you are sensitve to gluten in breadcrumbs, you can substitute ground oats or millet to prep the ground beef. Learn how in this Trail Bytes article.

Or you can use ground chickpeas as shown on the Dehydrating Chickpeas page.

Use only lean or extra lean ground beef with fat content in the 7% to 10% range. Grass fed beef is usually in the 7% to 10% range.

Ground beef with 15% fat content is often labeled as Ground Round. Ground beef labeled as Chuck or Hamburger will have higher fat content.

Some of the fat in the ground beef gets removed when you cook it. Some fat beads up on the surface of the meat while drying. Blot off the fat from the meat with paper towels after cooking it, and a couple of times while it dries. Starting with low fat meat and blotting off what you can during cooking and drying will minimize any risk of the meat spoiling after it is dried.

Adding breadcrumbs to ground beef before cooking and dehydrating.

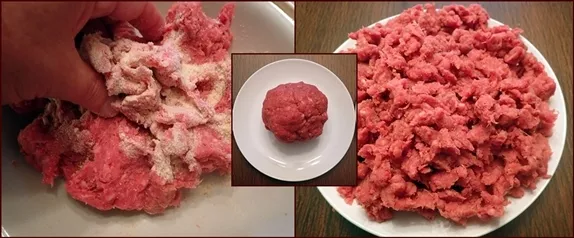
For each pound of beef, sprinkle ½-cup of finely ground breadcrumbs over the meat, or substitute ½-cup ground oats or ground dehydrated chickpeas.

Work the breadcrumbs into the raw meat with your fingers.

After working the breadcrumbs into the ground beef, form the meat into a ball and set aside for a few minutes.

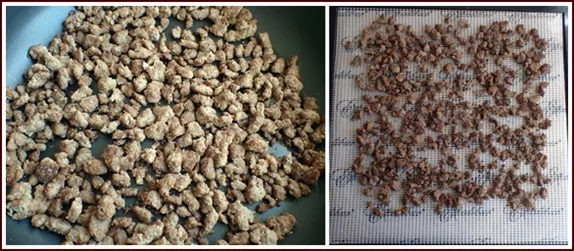
Break the meat into small pieces and cook in a frying pan over medium high heat until lightly browned and fully cooked, stirring continuously. Remove from heat and squeeze between paper towels to remove moisture.

Cooking and dehydrating ground beef.

Spread small pieces of ground beef on nonstick dehydrator trays or silicone mesh sheets.

Dehydrate ground beef at 145°F (63°C)  for approximately six hours. Ground beef will be hard when dry.

Once or twice during the drying process, move the meat around and squeeze with a paper towel to remove oil. Wipe any oil off the non-stick sheets. Break any pieces of meat that are drying slower than the rest in half.

Dehydrating meat separately allows me to include it in a wide variety of recipes which combine it with different starches (potatoes, rice and pasta) and vegetables.

You’ll find the complete collection of recipes which include dehydrated meat in my book, Recipes for Adventure.

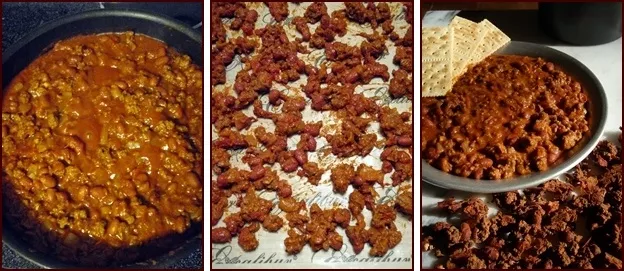
Dehydrating meat in a whole meal like chili.

You can also dehydrate meat in a complete meal like chili:

Dehydrating Meat in Chili.

And Explore these recipes shared by Backpacking Chef Readers:
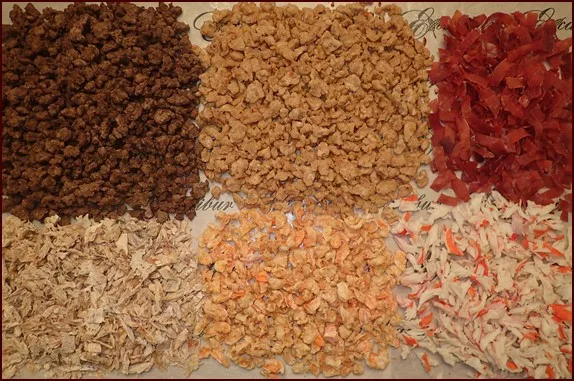
Dehydrated Beef Recipes


Hobo pack recipes

 From the NYT

When you’re camping, a foil packet — aluminum foil envelopes of ingredients — can be especially helpful. It’s essentially a single-serve steamer, so anything that can be steamed can be foil-packed. And when you’re ready to cook, all you’ll need to do is put the packet on the coals or grill grate.

Because you’re aiming to cook a number of ingredients in a single packet and working with the unpredictability of a campfire, there can be a lot to get right, so it can be helpful to streamline.

For instance, use already cooked proteins, like canned beans, rotisserie chicken and kielbasa or other smoked sausages, and quick-cooking vegetables, like frozen peas, cherry tomatoes, baby spinach or corn. If you want to eat something heartier, like carrots or potatoes, consider precooking them.

Be sure to add some oil or butter inside to keep ingredients from sticking, and go for heavy-duty or a double wrap of foil to avoid leaking. Because the ingredients aren’t getting any color, your dinner might need a little boost of flavor at the end. A spoonful of pesto or another sauce, fresh herbs, a sprinkle of cheese or a squeeze of lemon or lime are great for that.


  • Pair canned white beans with cherry tomatoes, pesto and a dollop of ricotta. Top cooked packets with arugula.

  • Top kielbasa with thinly sliced bell peppers and sauerkraut. Finish the cooked packets with thinly sliced scallions.

  • Tuck corn kernels alongside shredded rotisserie chicken and canned green chiles. Eat with tortillas, cilantro and a squeeze of lime.

  • Pair store-bought gnocchi with chopped asparagus, frozen peas, butter and lemon.

  • Cut a banana, in its peel, from tip to tip, and stuff it with mini marshmallows, chocolate and peanuts before wrapping in foil and warming in the fire until gooey and warm for a banana boat.

Monday, March 24, 2025

Chocolate BabKallah babkah challah mix

 This recipe was invented by Kenneth Druckenmiller, a member of Beth Israel Congregation in Bloomsburg (and as of 2025, president!), and a fantastic baker.

Chocolate BabKallah

Single loaf


Ingredients


Dough

  • 1/2 cup (120g) milk, lukewarm (105°F), whole milk preferred

  • 2 1/4 teaspoons instant or active dry yeast

  • 1/3 cup (65g) granulated sugar

  • 4 large egg yolks

  • 1 teaspoon Vanilla Extract

  • 3 1/4 cups (390g) All-Purpose Flour, plus more for kneading

  • 1 1/2 teaspoons (9g) kosher salt

  • 8 tablespoons (115g) unsalted butter, at room temperature, cut into 1/2" pieces, plus more for the bowl

Filling 1

  • 1 cup (170g) semisweet chocolate, finely chopped

  • 1/3 cup (71g) light brown sugar, packed

  • 1 1/2 teaspoons cinnamon

  • 1 ½ teaspoons espresso powder

  • 1/8 teaspoon table salt

  • 2 tablespoons (30g) unsalted butter, melted and cooled

Filling:

  • ¾ cup (130 grams) dark chocolate chips or chopped dark chocolate

  • ½ cup (1 stick | 120 grams) unsalted butter

  • ½ cup (50 grams) powdered sugar

  • ⅓ cup (30 grams) cocoa powder


Topping

  • 1 large egg, beaten

  • 1 Tbl. water

  • Coarse sugar for sprinkling on top, sanding or turbinado.


Instructions


  • To make the dough: In a large bowl, stir together the milk, yeast, sugar, egg yolks, and vanilla. Weigh your flour; or measure it by gently spooning it into a cup, then sweeping off any excess. Add the flour, salt, and butter and mix with a sturdy spoon or your hands to form a shaggy dough. (a stand mixer saves time)


  • Turn the dough out onto a lightly floured surface and knead, adding a bit more flour as necessary to prevent sticking, until the dough is smooth, supple, and no longer shiny, 8 to 10 minutes. Alternatively, you can knead using your stand mixer fitted with the dough hook attachment, mixing on medium speed for 5 to 8 minutes.  


  • Lightly butter the inside of a large clean bowl, then gather the dough into a ball and place it in the bowl. Cover the bowl with a damp towel or plastic wrap and let the dough rise in a warm place until it’s doubled, 1 1/2 to 2 1/2 hours, depending on the temperature of your kitchen.  


  • To make the filling: In a small bowl, toss together the chocolate, brown sugar, cinnamon, and salt; set aside. 

  • To assemble the babkallah: Turn the dough out onto a clean work surface and divide it into three equal portions, about 250g each. Shape each portion into a 12” rope.  

  • Flatten each rope with the heel of your hand, then use a rolling pin to roll each piece into a 12” × 6" rectangle (you shouldn't need any flour to prevent sticking). 


  • Brush the surface of each rectangle with the melted butter and sprinkle with the chocolate mixture, dividing it evenly among the three pieces and leaving a 1/2" border uncovered along one long edge of each piece of dough. 


  • Starting on the filling-covered long side, roll each rectangle into a spiraled log and pinch along the length of the seams to seal; it's important to seal the logs very well so they don’t unravel as you braid, which could compromise the spiral of filling in the finished babkallah. (you can use the bread scraper to loosen the edges if needed)


  • Cover the braids and let them rise again, they will not double this time, try for 50-75%

  • Brush with beaten egg & water mixture and sprinkle with sugar.


  • Bake at 350 for 25-35 minutes until the internal temperature reaches 190.  

Thursday, January 23, 2025

Tomato Soup

From  Inspired Taste 

Makes 2-3 servings

4 tablespoons unsalted butter

1/2 large onion, cut into large wedges

1 (28-ounce) can tomatoes, we prefer whole peeled tomatoes or crushed

1 ½ cups water, low sodium vegetable stock, or chicken stock

1/2 teaspoon fine sea salt, or more to taste

Directions

    1Melt the butter over medium heat in a Dutch oven or large saucepan.

    2Add onion wedges, water, tomatoes with their juices, and 1/2 teaspoon of salt.

    3Bring to a simmer. Cook, uncovered, for about 40 minutes. Stir occasionally and add additional salt as needed.

    4Blend the soup, and then season to taste. The soup doesn’t need to be ultra-smooth; some texture is nice. An immersion blender does make quick work of this, or you can use a blender. When using a regular blender, work in smaller batches, and don’t fill it too high – hot soup expands! For safety, remove the lid’s center insert and cover the opening with a kitchen towel while blending. This releases steam and prevents messy splatters.

    5Store homemade tomato soup in an airtight container in the fridge for up to three days or freeze for up to three months.