Saturday, November 18, 2017

Lisa's Kale Soup

1 onion, diced
2 carrots, diced
4 cloves garlic, crushed
4 C redskin potatoes, diced
8 C vegetable broth
1 can white beans
1 can diced tomatoes
1 bunch kale, chopped
Thyme, other herbs you like, salt, pepper

1. Saute the onions, carrots and garlic
2. Put in the potatoes and vegetable broth. Bring to boil.
3. Add everything else and cook until tender.

Sunday, October 8, 2017

Mom's cabbage rolls

My mom is the only person I know who makes cabbage rolls like this - sweet and sour.  It's also a wonderful comfort food.   If painstakingly dissecting a cabbage, then using the leaves to hand roll these treats isn't love, I don't know what is!

I find the process of peeling away the cabbage leaves, without ripping them, strangely meditative.

If your loved ones don't like raisins, brown sugar and lemon juice in their cabbage (Leon doesn't), just leave them out.  You can add it to your serving at the last minute if you have to.  I think this recipe, which includes onions in the beef, has some zing that I don't find in the halupkis made at local church picnics around Berwick and Bloomsburg, even without the raisins, sugar and lemon juice.

Ingredients:

1 large, loose head of cabbage.
2 TB oil
2 sliced onions
2 large cans of tomatoes
1 can of tomato paste
3 tsp. salt
1/2 tsp. pepper
1 pound ground beef
3 Tbs. rice, cooked al dente
4 Tbs. grated onion
1 egg
3 Tbs cold water
1/4 cup lemon juice
1/4 cup brown sugar
1/2 cup seedless golden raisins

1. Cook the rice

2. Cook the cabbage. You can boil it for an hour.  Or you can stick it in the microwave with a little water and steam it until leaves are soft enough to gently separate.  Run it under cold water when you're done, either way.

3. Heat oil in a really LARGE pot.  Lightly brown the sliced onions. Then add the tomatoes and mash them. Add 1/2 of the salt and pepper. Cook on low for 30 minutes.

4. While the tomatoes cook, mix the beef, rice, grated onion, egg and water.  Roll the mixture into a ball and put in the curve of a cabbage leaf. Tuck in the sides around the meatball and then roll it up, like a burrito.

5. Place the rolls in the sauce. Cover and simmer for 1.5 hours.

6. Add the brown sugar, lemon juice and raisins to taste. Cook 30 minutes longer.

Mom's magnificent noodle kugel

My mom sometimes makes this sweet kugel recipe as a main course - heaven knows it has enough calories to be a whole meal.  She got the recipe from my Great Aunt Lillian, whose photo oversees my kitchen.   I find noodle kugel is also a great breakfast, even served cold!  It's a great comfort food, reminded me of home.  It's also easy and fairly fast to make.

I've added one tweak to it over the years - the cornflakes (or rice flakes) coating the top.  I picked up this trick from Norman Mael, our synagogues premier chef.  I find it prevents the top noodles from burning, plus gives the kugel a satisfying crunch.  The only problem is if you can't serve it straight out of the oven.  The corn flakes get soft over time.  But it'll still be tasty!

Last time I served this was at our synagogue's pot luck Rosh Hashanah picnic at the Bloomsburg town boat launch.  The day reaffirmed the benefits of living in a small town - particularly THIS small town.

Rosh Hashanah is the Jewish New Year celebration.  An optional ceremony for it is a Tashlich service, which involves throwing bread into a body of water to symbolically throw away your sins.  I thought having the potluck immediately afterward, in the picnic pavilion by the boat launch, would be a grand way to celebrate the holiday. 

But I misremembered the number of picnic tables under the pavilion. 

I thought there were four. There were only two - not enough for a congregation picnic.  I discovered my error the day before, during a morning jog past the pavilion.  It was too late to move locations.  I didn't have a truck to haul the tables from the synagogue there, and they're tough to maneuver out of the basement anyway.

So Leon went to the town crew's building and told them my dilemma.  And by the next morning, those wonderful people used heavy equipment to bring two more tables to the pavilion there.  Yay, Bloomsburg!

Ingredients:
1 package of wide egg noodles, cooked al dente according to package directions.
Three eggs
1/2 C sugar
1/2 pound cottage cheese
1/2 pint sour cream (1 Cup)
1/4 pound cream cheese
1 tsp. vanilla
1 small can of crushed pineapple
golden raisins to taste (I use at least a cup)
1.5 C crushed cornflakes (optional)
cinnamon to taste.

1. Butter a 9x13 inch baking pan. Cook noodles al dente, according to the package directions.

2. Beat eggs well. Add 1/4 Cup sugar,  the cottage cheese, the sour cream, the cream cheese, the vanilla and the crushed pineapple. Mix.

3. Add the egg mixture to the cooked noodles. Mix. Add the raisins. 

4. Crush the corn flakes - I use a rolling pin.  Mix with the rest of the sugar and the cinnamon until you like the taste.  In a pinch - or if you misread the label - you can also use Special K rice flakes. Spread the corn flakes on top of your kugel.

If you don't use cornflakes, just mix the sugar and cinnamon and spread that over the top of the kugel.

5. Bake at 350 degrees for 45 minutes to an hour.


Wednesday, July 26, 2017

Portobello Mushrooms with Red Wine Reduction or "You'll be Happy as a Hobbit"

Sunday, March 20, 2011

Portobello Mushrooms with Red Wine Reduction

We got these beauties in our produce mix this week.  I make mushrooms this way as salad toppings, a side, mixed in pasta or a delicious topping to a steak or chicken.  They are SO flavorful! I absolutely love these. Cooking with wine can be intimidating at first, but trust me, it's nothing!  Open up a bottle of red wine, pour yourself a glass and get ready to eat in 10 minutes.  You will feel like a gourmet chef after this!
photo by sara tady ©

Ingredients:
Portobello or Crimini Mushrooms (wiped clean with a damp paper towel-do not run under water!)
Red wine
Butter
Salt and Pepper

Instructions:
1) Melt about about 1 tbsp of butter in a non-stick pan.  Medium heat.
2) Drop sliced, unseasoned portobellos or whole crimini mushroom caps in pan to saute 3 minutes.  Do not touch or mix around.
3) Flip over, salt and pepper. 2 minutes
4) Pour about 1/4-1/2 cup of red wine into pan.  Let reduce for 1-2 minutes until wine reduces or becomes absorbed.
photo by sara tady ©
Print this Recipe

Sunday, July 16, 2017

Endive, Apples, and Grapes

Ingredients

4 Servings
  • 2 large unpeeled tart-sweet apples (such as Fuji or Gala)
  • 1½ tablespoons salted butter
  • 2 large heads of Belgian endive (12–16 ounces total), halved lengthwise
  • 4 small clusters green grapes
  • 5 small rosemary sprigs
  • Fleur de sel or other sea salt
  • 2–3 tablespoons water
     

    Preparation

    Quarter and core apples. Using vegetable peeler, shave off thin strip of peel down center of each apple quarter, leaving remaining peel intact. Melt butter in large nonstick skillet over medium-low heat. Add endive, cut side down, to skillet. Add apple wedges, 1 cut side down, to skillet. Add grape clusters and scatter rosemary sprigs over; cook, uncovered, without turning or stirring, until endive is caramelized on bottom and apples are just tender, 15 to 20 minutes. Carefully turn endive, apples, and grapes over; baste with liquid in skillet and cook until apples are very tender, 5 to 10 minutes longer. Season with fleur de sel and freshly ground black pepper.
    Transfer endive mixture to platter. Add 2 to 3 tablespoons water to skillet, scraping up any caramelized bits, forming small amount of sauce. Spoon sauce over endive mixture and serve.
    Recipe by Dorie Greenspan

Vegetable Noodles

Summer is best time to start making vegetable ‘noodles’
Published: July 12, 2017

Vegetable “noodles” are super trendy, and summer is the best time to make them since the king of the veggie noodle — zucchini —is ubiquitous, and inexpensive.
Go ahead and load up, because zucchini is a true powerhouse of vitamins. One cup provides over a third of your daily vitamin C, and about 10 percent of five additional vitamins and minerals, and weighs in at under 20 calories.
While “zoodles” are easily the most popular noodle, noodles can be made from a variety of vegetables.
Try other summer squashes, winter squash such as butternut, beet, carrot, sweet potato and parsnips.
Veggie noodles are easy to make, too. You can buy an inexpensive spiralizer to make quick work of cutting perfectly-shaped noodles.
Or, you can even use your vegetable peeler to shave long, thin ribbons from your vegetables; no special equipment needed.
Cooking the noodles is quick, too: usually by steaming or sauteeing briefly.
Some veggies, like summer squash, can be left completely raw if you want, and made into a cold summer noodle-like salad.
If you have been seeking the perfect recipe to dip your toe into the veggie noodle world, today’s recipe is perfect.
Sunshine Vegetable Ribbons can be made in mere minutes using only a vegetable peeler and a pan as equipment.
The flavors are bright and familiar: a little garlic, lemon, toasted pine nuts and nutty parmesan cheese.
Serve this as a pretty first course, as a side dish or even as a vegetarian main course, with a thick slice of crusty Italian bread on the side.
Once you’ve mastered the vegetable peeler noodle, get creative and explore the endless options for this new technique, swapping in vegetables for pasta in your favorite recipes.
Sunshine Vegetable Ribbons
Servings: 4
Start to finish: 15 minutes
2 large carrots, peeled
2 crookneck squashes (yellow summer squash)
2 zucchini
2 teaspoons olive oil
1 garlic clove, minced
2 tablespoons lemon juice
2 tablespoons toasted pine nuts
1 ounce parmesan cheese, shaved into shards with a vegetable peeler
Lemon zest or fresh herbs for garnish, if desired
kosher salt
Freshly ground black pepper
Use a vegetable peeler to shave long, thin ribbons (like flat noodles) of the vegetables. (You will likely have a thin core remaining of each vegetable.)
Heat olive oil over medium heat in a large saute pan.
Add the garlic and saute for one minute, until fragrant.
Add the vegetable ribbons, a pinch of salt, and stir.
Add the lemon juice and cover with a lid for just one minute (or longer if you want very soft ribbons).
Remove the lid, and remove from heat.
Serve on four plates, topped with pine nuts, parmesan cheese, black pepper and lemon zest or fresh herbs.
Nutritional information per serving: 128 calories; 66 calories from fat; 7 g fat (2 g saturated; 0 g trans fats); 6 mg cholesterol; 408 mg sodium; 13 g carbohydrate; 3 g fiber; 7 g sugar; and 6 g protein.

Friday, June 2, 2017

Garlicky chicken with lemon anchovy sauce (Stolen from the New York TImes)

Garlicky Chicken With Lemon-Anchovy Sauce

  • Yield4 servings
  • Time25 minutes

Ingredients

  • 1 ¼ pounds boneless, skinless chicken thighs (4 to 5 thighs)
  • 1 teaspoon coarse kosher salt
  • Freshly ground black pepper
  • 6 garlic cloves, smashed and peeled
  • ¼ cup extra-virgin olive oil
  • 5 anchovy fillets
  • 2 tablespoons drained capers, patted dry
  • 1 large pinch chile flakes
  • 1 lemon, halved
  • Fresh chopped parsley, for serving

Preparation

  1. Heat oven to 350 degrees. Season the chicken thighs with salt and pepper and let rest while you prepare the anchovy-garlic oil. Mince one of the garlic cloves and set it aside for later. In a large, ovenproof skillet over medium-high heat, add the oil. When the oil is hot, add the 5 smashed whole garlic cloves, the anchovies, capers and chile. Let cook, stirring with a wooden spoon to break up the anchovies, until the garlic browns around the edges and the anchovies dissolve, 3 to 5 minutes.
  2. Add the chicken thighs and cook until nicely browned on one side, 5 to 7 minutes. Flip the thighs, place the pan in the oven and cook another 5 to 10 minutes, until the chicken is cooked through.
  3. When chicken is done, transfer thighs to a plate (be careful, as the pan handle will be hot). Place skillet back on the heat and add minced garlic and the juice of one lemon half. Cook for about 30 seconds, scraping up the browned bits on the bottom of the pan. Return chicken to the pan and cook it in the sauce for another 15 to 30 seconds.
  4. Transfer everything to a serving platter. Squeeze the remaining lemon half over the chicken and garnish with chopped parsley. Serve.

Tuesday, May 30, 2017

Blueberry pancakes


Blueberry Pancakes


At a glance

Prep
Bake
Total
Yield
1 dozen 5" pancakes, 6 servings
Nutrition information

Ingredients

  • 2 large eggs
  • 1 to 1 1/4 cups milk*
  • 2 teaspoons vanilla extract, optional
  • 3 tablespoons melted butter or vegetable oil
  • 1 1/2 cups King Arthur Unbleached All-Purpose Flour
  • 3/4 teaspoon salt
  • 2 teaspoons baking powder
  • 2 tablespoons sugar
  • 3/4 cup blueberries, fresh or frozen
  • *Use 1 cup milk if you're baking under hot, humid conditions, or if you're going to let the batter rest longer than 15 minutes. Use up to 1 1/4 cups milk in cold, dry conditions.

Instructions

  1. Heat a griddle to 350°F. If you don't have a griddle, heat a large frying pan over medium-low to medium heat. Grease the griddle. When it's hot enough, a drop of water will skitter across the surface, evaporating immediately.
  2. Beat the eggs, the smaller amount of milk, and vanilla until light and foamy, about 3 minutes at high speed of a stand or hand mixer. Stir in the melted butter or oil.
  3. Add the flour, salt, baking powder, and sugar, stirring just to combine. A few lumps are OK. Set the batter aside to rest for a couple of minutes; it'll thicken a bit as it stands. Thin the batter with additional milk if it's not pourable consistency.
  4. Drop the batter by 1/4 cupfuls onto the prepared griddle or pan; a muffin scoop works well here. Sprinkle 1 tablespoon berries atop each pancake.
  5. Cook the cakes till they're golden brown on the bottom, about 2 minutes. Flip them over, and cook till the other side is golden, 2 to 2 1/2 minutes.
  6. Serve the pancakes immediately. Or transfer them to a platter, cover, and keep warm in a 200°F oven. Enjoy with butter and maple syrup.


Tips from our bakers

  • What kind of milk should you use in this recipe—skim, whole, something in between? It's up to you; skim milk will yield the least tender pancake, whole milk the most tender.
  • If you use fresh berries, mix them right into the batter. If you use frozen berries, it's better to scatter them atop the cooking pancakes. If you mix them into the batter, they'll tint your pancakes a rather unappetizing shade of green.
  • Why is it helpful to let pancake batter rest before cooking the pancakes? Because it gives the baking powder a chance to start working, and the flour time to start absorbing the liquid, both of which make for fluffier pancakes.

Canelli bean soup with garlic and parsley

This recipe is being stolen from my friends, Justin and Dillon Naylor at Old Tioga Farm. If they say it's good, I have no doubt it is!

Cannellini bean soup with garlic & parsley

Tags
, ,
When Marcella Hazan passed away almost four years ago, tributes came pouring in from every major newspaper, and from chefs and home cooks from across the country. Invariably, the eulogist would mention Marcella’s most simple and exquisite pasta sauce with tomatoes, onions, and butter. It’s a sauce I’ve never had in Italy (perhaps Marcella made it up herself), but it became a symbol to many people of her forceful dedication to simplicity and flavor.
Another dish that comes to mind in this way is Marcella’s cannellini bean soup with garlic and parsley. It exemplifies the same extreme minimalism as the pasta sauce and demonstrates the principle that Marcella was always preaching: what you leave out of a dish is as important as what you include. Her understanding of her native country’s cooking was not only at odds with the caricature of Italian food in America at the time, but it was also at odds with the great majority of cooking from restaurant chefs, with their fixation on presentation and technical execution over freshness and taste.
We’ve been serving the bean soup this month at Old Tioga Farm, and though I’ve been making the soup for myself and family for almost twenty years now, I hadn’t served it at the restaurant in a while. Making it for the past few weeks has given me the opportunity to reflect anew on the recipe and on Marcella’s understanding of good cooking.
Marcella knew that it was not presentation, but flavor, which matters most in cooking. The bean soup is not going to win any prize for beauty, nor is it likely to appeal to the food porn crowd. But that’s not the point. When you taste the soup, if it is well made, you’re struck by a few very simple but powerful flavors: the beans themselves, soft and rich, substantial but yet dissolving; an underpinning of garlic, not so much as to overwhelm but just enough to serve as a sort of bass line, aromatic but not browned or harsh; parsley, the most common herb in Italian cooking, which provides freshness like no other herb; a light meat broth, refined and delicate, never intense and concentrated; and last but not least, olive oil of the very highest quality, an ingredient whose quality will make or break this soup. The oil infuses the beans with and enfolds them in its glow. A great oil will elevate the beans. A poor one will flatten them.
This, to me, is what good cooking is all about; at least, good Italian cooking. A few ingredients of highest quality, assembled in a way which just develops their full potential without confusing everything with excess complication. This is food meant not to impress so much as nourish. This is the philosophy of cooking which I learned from Marcella, which changed the course of my life, and inspires me every day in my home and restaurant kitchens.
Cannellini Bean Soup with Garlic and Parsley
I make this soup almost identically to Marcella. Of course, Marcella knew that not even the same cook prepares the same dish identically every time. My version is definitely a little more liberal with the garlic, and I also like the soup less thick but more pureed than Marcella. According to Marcella’s husband Victor, Marcella learned the soup from her father. She taught it to countless cooks through her classes and books, and now I share it with you.
Begin the night before by soaking one pound of dried cannellini beans. Certainly, if you must, use canned beans. I certainly have on occasion. The best canned beans I know of are the ones from Goya. Be aware that other brands might be over- or under-seasoned with salt. But do try to use dried beans for the full experience. If you forget to soak them overnight, you can skip that step, but it will take a little longer to cook them. Not a big deal. Cook in a big pot with water to cover and 2 or 3 teaspoons salt until tender, about an hour or two.
The soup also requires good homemade broth, which is one of the very simplest things you can do to improve the quality of your soups. The simplest vegetable broth just contains an onion and a few carrots and celery stalks, simmered for an hour in about 2 quarts of water. A more complex broth adds a whole chicken, or just a carcass, or just some chicken parts thrown in with the vegetables and simmered for closer to 3 hours. Another layer of flavor would involve adding some beef scraps or bones. There would be no harm in adding some tomatoes, or sweet peppers, or potatoes, or zucchini. But all of that is icing on the cake. A simple vegetable or chicken broth will do just fine.
When the beans are tender and the broth is made, you can begin to make the soup by sautéing one tablespoon garlic (Marcella used only 1 teaspoon) in 1/2 cup highest quality olive oil. You might find this an excessive amount of olive oil. It most certainly is not. It is an essential flavor component of this soup. As the winemaker Paolo di Marchi once told me: “In Tuscany, we think of olive oil as just another vegetable.” And so it is.
When the garlic is sizzling and taking on just a hint of color, add the beans, which should have been drained from their cooking liquid and tasted for proper seasoning. Let the beans absorb the flavor of the olive oil over moderate heat for about five minutes, and then add 2 cups or so of broth.
Pass about one third to one half of the beans through a food mill, or (if you must) put them in a blender, and then return them to the pot. This will thicken the soup a little.
Add more broth as needed to create the consistency you want. Some like it very thick. I like it more like a traditional soup. After the flavors have married for 10 minutes or so and the seasoning is just right, add a generous bit of freshly chopped parsley and several grindings of black pepper.
Garnish with a little drizzle of olive oil, what Italians would call “a benediction.”

Friday, March 10, 2017

Shay's Rich and Eggy Challah

Shay Butasek, a member of our congregation, gave me this recipe.  Unfortunately, she did not mention the recipe makes enough dough for two loaves! The result? Chazillah!


The monster challah was a little dry - I cooked it too long, thinking it would need the extra time. But it was tasty, nonetheless.  The glaze was beautiful.  And this braid is the prettiest - and easiest - I've tried yet!


So, here's the recipe:
 
2 packages active dry yeast
1 stick (half a cup) of butter
5 cups flour
1 tsp salt
1/4 C sugar
1 1/4 C very warm water
4 eggs
1 egg yolk blended with 1 tsp. milk
 
1. Combine yeast, 1/2 C flour, salt and sugar together in mixing bowl. Stir. Pour in water and beat until smooth.
 
2. Mix in butter and eggs. Gradually add more flour until you have a soft dough. Knead on a floured board until the dough is smooth and elastic (bounces back when you push it.) Place in greased bowl, turning dough to grease it lightly. over with clean towel and let it rise in a warm place until it is double in size - about 1 1/2 hours.
 
3. Punch dough down. Divide in half. Take one half and divide in four strands. Pinch them together at the top. Then take the strand on the far right, bring it over the next one, under the third and over the fourth. Repeat, always starting on the right, until the braid is complete. Tuck ends under and pinch to seal.
 
4. Cut enough dough off the ends to make 3/4 cup. Roll into three strands as long as your loaf, then braid them into a three-stranded braid. (Pinch them together at the top. Put the rightmost over the middle one. Put the leftmost over the new middle one. Repeat until braid is done.) Lay the three-stranded braid over the large four-stranded braid.
 
5. Repeat steps 3 and 4 with a second loaf.
 
6. Cover loaves with a towel and let rise until doubled.
 
7. Brush with egg yolk mixture and bake at 350 degrees for 35 minutes.
 
8. Eat with butter and honey!


Thursday, March 2, 2017

Super bubbles!

How To Make Bubbles | Super Soap Solution

How To Make Bubbles | Super Soap Solution
You can blow bubbles with any mixture of soap and water, but add a "secret" ingredient and you'll get bigger and stronger bubbles! Just follow this recipe.

What You Need:

  • Liquid dish soap (Joy or Dawn brands work best. Try to find one that doesn't say 'Ultra')
  • Distilled water (tap water is okay, but distilled water makes the best bubbles)
  • Clean container with lid
  • Glycerin or light corn syrup


  • What You Do:

    1. Measure 6 cups of water into one container, then pour 1 cup of dish soap into the water and slowly stir it until the soap is mixed in. Try not to let foam or bubbles form while you stir.
    2. Measure 1 tablespoon of glycerin or 1/4 cup of corn syrup and add it to the container. Stir the solution until it is mixed together.
    3. You can use the solution right away, but to make even better bubbles, put the lid on the container and let your super bubble solution sit overnight.  (Note: If you used "Ultra" dish soap, double the amount of glycerin or corn syrup.)
    4. Dip a bubble wand* or straw into the mixture, slowly pull it out, wait a few seconds, and then blow. How big of a bubble can you make? How many bubbles can you make in one breath?
    *You can make your own bubble wand by cutting off the end of the bulb of a plastic pipet. Dip the cut end in solution and blow through the narrow end.
    components of a bubble

    What Happened:

    The soap mixture on the outside of a bubble is actually made of three very thin layers: soap, water, and another layer of soap. This "sandwich" that is on the outside of a bubble is called a soap film. A bubble pops when the water that is trapped between the layers of soap evaporates. The glycerin or corn syrup mixes with the soap to make it thicker.  The thicker skin of the glycerin bubbles keeps the water from evaporating as quickly, so they last longer. It also makes them stronger, so you can blow bigger bubbles.

    Bubbles That Don't Pop!

    After you make the super bubble solution and let it set for at least one day, try doing this cool bubble trick!
    1. Set the lid of your bubble container on the table so that the part with the lip is facing up. Fill the lid with bubble solution.
    2. Dip a straw into the bubble solution container so that it is wet half way up the straw. Touch the straw to the lid and blow a bubble on the lid. Slowly pull the straw all the way out of the bubble.
    3. Now dip the pointed end of a pair of scissors into the container of bubble solution. Make sure they are completely wet. Poke the scissors through the wall of your bubble. Watch what happens. Try it again with other pointed objects (pencils, etc.), just make sure anything you touch to the bubble is wet. Can you stick your finger through the bubble?

    What Happened:

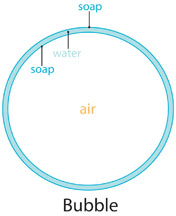
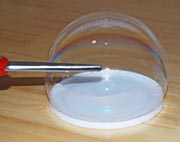
    You should have been able to push the scissors through the wall of the bubble without popping it. When something wet touches a bubble, it doesn't poke a hole in the wall of the bubble, it just slides through and the bubble forms right around it. The bubble solution on the scissors filled in the hole that would have been made. If you try poking dry scissors through your bubble, you will see it pop instantly! (If it popped when you put the wet scissors in, something was probably too dry. Try it again and make sure anything that touches the bubble is completely wet with bubble solution.)
    Try a couple more tricks:
    • Make a big dome bubble on the lid like you did above, then get the straw wet again, insert it into the bubble, and see if you can blow a smaller bubble inside the bigger one!
    • Get one hand completely wet in the bubble solution then use the other hand to hold your bubble blower and blow a big bubble in the palm of your wet hand.

Tuesday, February 7, 2017

Rosh Hashanah pomegranate challah

Thanks to Janice Broder for sending me this recipe from The Forward. There are better pictures at http://www.thechallahblog.com/2012/08/rosh-hashanah-challah-shape-pomegranate.html.  I also think six loaves is excessive - I'm cutting this back to 2. We'll try it at the Challah-Day at synagogue Feb. 17!


7-Species Pomegranate-Shaped Challah

The Secrets of the 7-Species Challah

Yields 6 loaves
4 tablespoons dry yeast
2 tablespoons organic sugar
4 cups (1 liter) warm water
5 pounds (2.25 kg) organic white flour
One 12-ounce (350 g) container of date honey (silan)
1½ tablespoons sea salt
1 cup (230 ml) olive oil
1 cup (150 g) finely-diced dried figs
1 cup (150 g) raisins
Topping
2 cage-free organic eggs, beaten
2 tablespoons pomegranate syrup, in egg wash
Barley grits
1) In a medium-size bowl, combine the yeast with the 2 tablespoons of sugar and the warm water. Cover the bowl and allow the mixture to start activating. Yeast activation should take about 10 minutes; it will be bubbling and foamy.
2) Set 1 cup (125 g) of flour aside. Sift the remaining flour, and salt into a large bowl. Form a well in the center.
ADVERTISEMENT
x
3) Pour the date honey (silan), yeast mixture and oil into the well. Combine all the ingredients, using a spatula. When it begins to form a dough, it is time to knead. At this point, you can remove the dough from the bowl and knead on the kitchen counter if it’s easier for you, or directly in the bowl.
4) To knead the dough: Grab the side of the dough furthest away from you and fold it toward yourself. Fold the dough in half and use your body weight to push the dough into itself. If you find that the dough is sticking too much to the surface and preventing you from kneading properly, dust the dough with flour. Give the dough a quarter turn (90 degrees). Grab the other side and fold it in half. Again, with a lot of weight behind it, push the newly folded half into itself. Repeat this process for 10-15 minutes, or until the dough is smooth, silky, elastic and the dough does not stick to the surface.
5) After the dough is thoroughly prepared, lay it on the counter top while you grease the bowl with a fine layer of oil. Next, turn the dough in the oil several times so that the dough is greased lightly on all sides.
6)Cover the bowl with a large plastic garbage bag or kitchen towel and allow it to rise for 1 hour.
7) Make the blessing on Hafrashat Challah .
8) Knead the dried figs and raisins into the dough again for a few more minutes and then divide dough into 12 equal parts. Use the remaining cup of flour, as needed, to flour the surface area, and hands to prevent sticking.
9 )With a rolling pin, roll out 6 of the balls into nice smooth strands – as long as you can, and then continue to extend the strands with your palms, out really long– about 4 feet (1.2 m). This will form the “frame” of your pomegranate.
10) On a piece of parchment paper that has been placed on a greased baking sheet, shape the long strand into an S-shape.
11) Roll out the rest of your dough (the remaining 6 logs) and cut them into 1-inch (2.5 cm) size pieces. Roll each piece in your palms, into the size of a golf-ball. You will use these as pomegranate “seeds.”
12) Place about eight “seed” dough balls into the lower half of the S. This will form the body of your pomegranate. Then take the upper half of the S and reshape it into the top of the pomegranate, in a zigzag, making sure to pinch the ends closed.
13) Repeat with the other strands and balls to form the other five pomegranate challahs.
14) Don’t let this challah rise as long as you normally would, as it would completely lose its shape. Limit the second rise to just 15 minutes. Pinch the ends again before glazing the challah with egg-wash.
15)If you cannot bake the challahs immediately, then this is the time to wrap the shaped dough in plastic wrap to prevent drying. You can store it in the coldest part of the refrigerator for up to 48 hours. On the day of baking, remove the dough from refrigerator and let stand on kitchen counter until it comes to room temperature, about one hour.
16) Preheat the oven to 350°F (180°C). Mix the beaten eggs with the pomegranate syrup. Brush your challahs with beaten eggs and sprinkle with barley grits.
17) Bake in your preheated oven for about 30-35 minutes, or until loaves turn golden brown and shiny. Bread should have a nice hollow sound when thumped on the bottom.
18) Remove from the oven and cool on a rack. Wait at least one hour before serving. If you are freezing the challah, wrap in waxed paper and foil. It can be stored in the freezer for up to 2 months.