Saturday, October 10, 2020

Golden Tumeric Cauliflower soup


Description

Cozy, bright, and healing with power-foods like turmeric, cauliflower, and cashews. Topped with crispy chickpeas. Super creamy and SO GOOD.


Scale

Ingredients

  • 2 tablespoons olive oil
  • half an onion, chopped
  • 2 cloves garlic, chopped
  • 1 head of cauliflower, chopped into about 5 cups of chunks or florets
  • 1 cup cashews
  • 1 tablespoon turmeric  – see notes
  • 7–8 cups water
  • 2 teaspoons salt
  • a squeeze of lemon juice

Instructions

  1. Sauté: Heat the oil in a deep soup pot. Add the onion, garlic, cauliflower, cashews, and turmeric. Sauté for 10 minutes or until very fragrant.
  2. Simmer: Add the water (I usually start with 4 cups) and salt. Simmer until softened.
  3. Blend: Transfer the soup to a blender and blend into a creamy consistency. It’s best to do this in batches.
  4. Finish: Return to the soup pot and add any additional water (remaining 2-3 cups) if you need to thin it out. Also a good time to season with more salt and a squeeze of lemon juice. Also a good time to top with spiced chickpeas and parsley and olive oil and more salt and put on your most comfy sweater and FALL IN LOVE. ♡
  5. For the Spiced Chickpea Topping: Drain and rinse 2 14-ounce cans chickpeas. Spread them on a baking sheet. Preheat oven to 400. Sprinkle chickpeas with a dusting of cumin, smoked paprika, turmeric, salt, and/or any other spice combo you want. Drizzle with olive oil. Stir right on the pan, then roast for 30-40 minutes or until semi-crispy.

    Turmeric: Turmeric has a strong flavor, so if you’ve never tried it before and you’re not sure you will like it, I would suggest using 1-2 teaspoons to start. If you’re a confident turmeric user, go for the full 1 tablespoon!

    Blender Stains: Depending on your blender, this soup can leave a stain from the turmeric. If this happens, we recommend leaving your blender sitting in a window in the sun for a day or two which will help get rid of the stains!


Tuesday, August 11, 2020

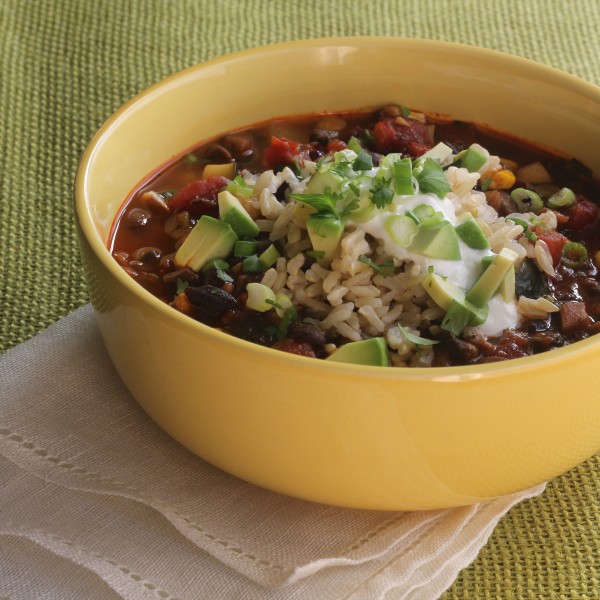
Vegan Chili


Vegetarian Chili

  • Prep Time: 30 minutes
  • Total Time: 1 1/2 hours
  • Yield: 6 to 8 servings

Ingredients

  • 3 tablespoons olive oil
  • 1 1/2 cups chopped yellow onions
  • 1 red bell pepper, stemmed, seeded, and chopped
  • 1 poblano pepper, stemmed, seeded and chopped
  • 2 to 3 serrano chiles, minced
  • 1 1/2 pounds baby bella mushrooms, diced
  • Salt and cayenne pepper, to taste
  • 3 tablespoons minced garlic
  • 3 tablespoons chili powder
  • 1 tablespoon ground cumin
  • 1 teaspoon Mexican oregano, crushed between your fingers
  • 1/2 bunch cilantro, stems and leaves separated and both finely chopped
  • 2 bay leaves
  • Two 14.5 ounce cans petite diced tomatoes (with juices)
  • 3 cups water, or more as needed
  • Two cans black beans, drained and rinsed under cool water
  • 1 large zucchini, diced
  • 2 cups fresh or frozen corn kernels
  • Cooked brown rice, for serving
  • Sour cream, for serving
  • Chopped green onions, for serving
  • Diced avocado, for serving

Directions

  • Heat the oil over medium high heat in a large heavy Dutch oven and saute the onions, bell pepper, poblano, and serrano chiles until the vegetables are soft, 4 to 6 minutes.

    Add the mushrooms, season lightly with salt and cayenne, and continue to cook, stirring as needed, until the mushrooms have given off their liquid and then begin to brown around the edges, 4 to 6 minutes longer.

    Add the garlic, chili powder, cumin, oregano, cilantro stems, bay leaves, and cook until the spices are fragrant, 1 to 2 minutes.

    Stir in the canned tomatoes and 2 cups of the water. Bring to a simmer, lower heat so that the chili gently bubbles, and cook for about 20 minutes, adding more water if the chili gets too thick.

    Add the beans and cook until thickened, about 10 minutes longer. Stir in the zucchini and cook for 5 minutes, then stir in the corn and any additional water to correct the consistency if the chili has become too thick. Cook until the zucchini is softened but not mushy, about 10 minutes, then stir in the cilantro leaves, correct the seasoning with salt and cayenne, and remove from the heat.

    Serve the chili garnished with a spoonful of brown rice, a dollop of sour cream, and a sprinkling of green onions and diced avocado.


Wednesday, August 5, 2020

Date and Honey Zucchini Bread

The same edition of the Press Enterprise that brought me the eggplant tart brought this recipe.  I haven't tried it yet.  But I'm going to!


Date and Honey Zucchini Bread

Start to finish: 11/2 hours

Servings: 10

11/2 cups all-purpose flour, plus more for dusting the pan

11/2 cups white whole-wheat flour

1 teaspoon baking powder

1 teaspoon baking soda

1 teaspoon kosher salt

11/2 teaspoons cinnamon

3/4 teaspoon ground nutmeg

3 eggs

1 cup honey

1 cup vegetable oil

2 teaspoons vanilla extract

2 cups packed shredded zucchini (not peeled)

1 cup coarsely chopped medjool dates

Set a rack in the center of the oven.

Heat the oven to 350 degrees.

Mist a Bundt pan with baking spray.

In medium bowl, whisk together both flours, the baking powder, baking soda, salt, cinnamon and nutmeg. Set aside.

In a large bowl, whisk the eggs until well beaten.

Stir in the honey, oil and vanilla, then fold in the zucchini.

Add dry ingredients and chopped dates to the zucchini mixture.

Stir just until the dry ingredients are just moistened.

Do not over mix.

Pour the batter into the prepared bundt pan.

Bake until a toothpick inserted at the center of the loaf comes out clean and dry, 50 to 60 minutes.

Let cool in the pan for 10 minutes, then turn out onto a wire rack to cool completely.

Serve warm or at room temperature.

Nutritional information per serving: 510 calories; 210 calories from fat (41 percent of total calories); 24 g fat (2 g saturated; 0.5 g trans fats); 55 mg cholesterol; 71 g carbohydrate; 5 g fiber; 40 g sugar; 7 g protein; and 400 mg sodium.


Caramelized Onion, Eggplant and Heirloom Tomato Tart

I took this recipe from the Press Enterprise Sept. 4, 2013, edition.  It was meant for a summer Rosh Hashanah recipe - the Jewish New Year.  But I find it's one of my favorite summer recipes.

A few tips - the 2 hour time is extremely optimistic.  It takes me at least 3 hours, what with the chopping and everything.

And I rarely get the dough to come up in a nice, easy crust to be draped prettily into the springform pan.  Luckily, it doesn't matter.  If it breaks into pieces, press it into place, use your fingers to smooth over the cracks and rips, and pretty up the edges by crimping them like a pie crust.  Or not - it won't matter. Once it bakes, the crust will be just fine.  And this recipe is always a hit!


Caramelized Onion, Eggplant and Heirloom Tomato Tart

Start to finish: 2 hours

Servings: 8

For the crust:

2 cups all-purpose flour

1 teaspoon kosher salt

1/2 cup extra-virgin olive oil, chilled in the freezer for 1 hour

4 tablespoons ice water

For the filling:

Olive oil cooking spray

13/4 pounds small eggplants, peel and cut into 1/2-inch-thick rounds

Kosher salt and ground black pepper

2 tablespoons extra-virgin olive oil

4 cups thinly sliced red onions (about 3 large)

1/2 teaspoon dried thyme

1 tablespoon balsamic vinegar

4 heirloom tomatoes (multiple colors), cut into 1/4-inch-thick slices

Fresh basil leaves, to garnish

To make the crust, in a large bowl whisk together flour and salt.

Add chilled olive oil and using clean hands or a fork, mix until the oil is incorporated and the mixture is the consistency of small peas.

Add the ice water and mix until dough has just formed.

Shaped into a 6-inch disk, wrap tightly in plastic wrap and refrigerate for at least 1 hour.

Meanwhile, prepare the filling.

Position an oven rack in the middle of the oven. Heat the oven to 375 degrees.

Coat a large baking sheet with olive oil cooking spray.

Mist the eggplant rounds with cooking spray, then season both sides of each slice with salt and pepper.

Arrange the eggplants slices in a single layer on the prepared baking sheet.

Bake for 30 minutes, or until soft and golden brown.

Remove from the oven and set aside.

While the eggplant cooks, in a large saucepan over medium, heat the olive oil.

Add the onions and saute until softened and translucent, about 5 minutes.

Stir in 1 teaspoon salt and the thyme, then reduce heat to low.

Cook, stirring occasionally so the onions don’t burn, until very soft and browned, about another 30 minutes.

Stir in the vinegar and remove from heat.

Mist an 11-inch springform tart pan (or a tart pan with a removable bottom) with cooking spray.

On a clean, floured surface using a floured rolling pin, roll the chilled dough into a 13-inch circle.

Transfer the dough to the tart pan and fold in and press together the overhanging dough to build up the edges.

If the dough tears or breaks, simply piece it together and press it into the pan.

Spread the onion mixture in an even layer over the bottom of the tart.

Add an even layer of the eggplant.

Top with tomato slices arranged in an overlapping circular pattern.

Spray the top of the tart with olive oil cooking spray, then season with salt and pepper.

Bake until the crust is golden and the tomatoes are slightly browned, about 45 minutes.

Remove from oven and cool on a rack. Remove the outer ring of the pan and transfer the tart to a serving plate.

Slice into 8 wedges and serve warm, at room temperature or chilled.

Serve garnished with torn basil leaves.

Nutritional information per serving: 340 calories; 160 calories from fat (47 percent of total calories); 18 g fat (2.5 g saturated; 0 g trans fats); 0 mg cholesterol; 41 g carbohydrate; 7 g fiber; 8 g sugar; 6 g protein; and 610 mg sodium.

Thursday, April 23, 2020

Perfect Boiled Eggs


    Perfect Boiled Eggs
    Christopher Testani for The New York Times. Food Stylist: Simon Andrews.

    INGREDients

    •  Up to 12 eggs (see note)PREPARATION
    1. Find a lidded saucepan large enough to allow your eggs to comfortably fit on the bottom in a single layer. Add 1 inch of water, cover, and bring to a boil.
    2. Gently lower eggs into the saucepan using a slotted spoon or a steamer basket. (It’s O.K. if the eggs are partly submerged on the bottom of the pot, or elevated on a steamer rack and not submerged at all.) Cover pan and cook eggs, adjusting the burner to maintain a vigorous boil, 6 minutes for a warm liquid yolk and firm whites, 8 1/2 minutes for a translucent, fudgy yolk, or 11 minutes for a yolk that is just barely firm all the way through.
    3. Drain eggs, then peel and eat immediately, or transfer them to a plate and allow them to cool naturally before storing in the refrigerator for up to a week directly in their shell. (A small dot made with a permanent marker on the top of each cooked egg will ensure you don’t mix them up with the raw eggs.) Do not shock them in an ice bath after cooking; this makes them more difficult to peel.

    Tip

    • On a regular home burner, you can cook as many eggs as will fit in a single layer in your pot, up to around a dozen. (Any more and the temperature in the pot will affect cooking.) A steamer basket is not necessary, but it can help you raise and lower eggs gently, preventing accidental cracks. If you have trouble with eggs cracking during cooking, use a pushpin to poke a small hole through the shell on the fat end of the eggs. (This can also help minimize the dimple that forms on the cooked egg white due to an internal air pocket.) The eggs in this recipe should be cooked straight from the refrigerator; reduce cooking times by 1 minute if using room-temperature eggs.

    Sunday, April 12, 2020

    Hamantaschen


    Hamantaschen - the quintessential Purim food! It's the one exotic recipe even coworkers who didn't like exotic recipes loved - in fact, the dough, nut and poppy seed recipes in this post come from a book Eileen Summers gave me during an office Christmas gift exchange - ah, the joys of being part of a multi-cultural community!

    I used to make a different version at home, though the prune filling was similar.  The recipe my mom used included honey in the dough, and was much more cake-like. It would also completely cover the filling.  The key point was that it was also still folded in triangles.

    Why triangles?  Because the cookies symbolize Haman, the bad guy in the Purim story who tries to destroy the Jews, wore a triangular hat.  Why did he hate the Jews? Because one of them - Mordechai, one of the heroes of the story - won't bow down to him.  Also because his people traditionally hated the Jews.  I always find this story slapstick - Haman continually misunderstands what is happening, and is misunderstood himself.  The most Marx Brothers moment, I think, is toward the end, when Queen Esther reveals herself to be Jewish, and the king - who up until this point was perfectly O.K. with Haman's plot to commit genocide - agrees to let the Jews strike at Haman's people first.  Then the king apparently leaves the room for a minute.  Haman throws himself on the Queen's couch to beg for mercy.  That's when the king walks back in, sees Haman sprawled there, upon the cushions where the Queen is lying, and interprets his intention in an entirely different light.  As punishment for molesting the Queen, he orders Haman strung up on the gallows Haman built for Mordechai.  And for good measure, he hangs Haman's 10 sons, too.  You can read the whole bloody comedy - and the ending is literally bloody enough to make Hamlet look rated G - here.

    Except Joan Nathan says some people say the name hamantaschen come from "tash kocho," meaning "May Haman's strength become weak." And some say that the cookies symbolize Haman's ear. And others say - this is my personal favorite - the cookies are named from "mun-tasche," or "poppy seed bag," which would make the name a pun. Ha-mun. Get it?

    Anyway, whatever the origins, they're delicious! I ship some off to family and close friends every year.

    Here are the recipes:

    WARNING: THE POPPY SEED AND NUT FILLINGS ARE DELICIOUS, BUT THEY MAKE A LOT OF FILLING.  A SYNAGOGUE'S WORTH OF FILLING.  AND THEN SOME. YOU NEED MAYBE A QUARTER OF THE RECIPE TO FILL 36 HAMANTASCHEN. Or you could use the leftovers to make a nut or poppy seed roll.  Or you could ship a lot to family and friends.

    Poppy Seed Filling (From Joan Nathan's "The Jewish Holiday Kitchen")

    1 pound (2 Cups) sugar
    1/2 Cup water
    1 pound (2 Cups) poppy seeds
    2 egg whites
    1 tsp. vanilla
    rind and juice of 1 lemon
    rind and juice of 1 orange
    2 TBs rum
    4 ounces (1/2 Cup) raisins (I prefer the golden ones.)
    2 ounces (1/4 Cup) figs
    Cinnamon to taste
    2 Cups apricot or raspberry jam (I prefer apricot)
    1/2 Cup unsalted butter or margarine (I use butter)

    1. Simmer sugar and water while stirring over low heat, until sugar dissolves.

    2. Add the poppy seeds. (The recipe says to grind the seeds in a food processor or blender. I never found that to work - the seeds are too small.)

    3. Add egg whites, vanilla, lemon and orange rinds and juices, rum, raisins, figs and cinnamon. Simmer over low heat for about 5 minutes.

    4. Add the jam and butter until the butter is melted and the ingredients combined. Then put in the fridge for at least a few hours, until it isn't too runny, before using in cookies. I usually make this on a different day and store it at least overnight in the fridge.  But it actually keeps for a surprising long time - weeks, even!

    Nut filling (From Joan Nathan)

    1 3/4 Cup sugar
    2 Cups ground walnuts
    2 egg whites
    1 tsp. vanilla
    rind and juice of 1 lemon
    rind and juice of 1 orange
    2 TBs rum
    4 ounces (1/2 Cup) raisins (I prefer the golden ones.)
    4 figs
    1 tsp. Cinnamon or to taste
    2 Cups apricot jam or orange marmalade

    Combine all the ingredients, mix well, and refrigerate.

    Prune filling (a.k.a Lekvar, if you don't like calling it prune.  Or call it dried plum.) (From Karen's Kitchen Stories)

    1 1/2 Cup pitted prunes
    2/3 Cup water
    1 tsp. lemon zest
    3 Tablespoons orange juice
    1/3 Cup brown sugar

    1. Put everything except the sugar in a small saucepan and simmer, covered,  about 30 minutes, until most of the water is absorbed.

    2. Remove from heat, stir in the brown sugar, and mash or blend into a puree.  I found an immersion blender works really well, but a food processor or normal blender will also do the job.

    Cookie Dough and Putting It All Together (From Joan Nathan)

    2/3 Cup butter or margarine (I use butter)
    1/2 Cup sugar
    1 egg
    1/2 tsp. vanilla
    2-3 Cups all-purpose flour
    1 tsp. baking powder
    dash of salt

    1. Cream the butter with sugar.  Add the egg and continue creaming until smooth.

    2. Add the vanilla. Stir in flour, baking powder and salt until a ball is formed. (A food processor works great for this!)  Keep adding flour until dough is dry enough to roll.

    3. Preheat oven to 375 degrees. Put parchment paper on a cookie sheet.

    4. Use about half the dough to roll out on a lightly-floured board to a thickness of about 1/8 inch.  Cut into 2-inch circles (water glasses work well for this.)

    5. MOST IMPORTANT STEP - Dip your finger in a cup of water and run it around the rim of a circle.  If you don't do this, your cookie won't hold together.

    6. Put a dab of your choice of filling into the center of the circle. Pinch together the rim about halfway down. Fold the bottom up to form a triangle and pinch together the remaining to corners the same way.  A little spot of filling should peek through the center.

    7. Put on the cookie sheet and bake 10-16 minutes, until the tops are golden.


    Thursday, February 20, 2020

    Roasted Brussels Sprouts

    Roasted Brussels Sprouts

    (STOLEN FROM SIMPLY RECIPES.COM)

    Even the most adamant sprouts haters will love these roasted Brussels sprouts with garlic, olive oil, lemon juice, and Parmesan cheese. So crispy and delicious!
    • Prep time: 10 minutes
    • Cook time: 35 minutes
    • Yield: Serves 4

    Ingredients

    • 1 pound Brussels sprouts, rinsed, ends trimmed, and rough outer leaves of larger sprouts removed
    • 1 tablespoon minced garlic (about 3 cloves)
    • 1 teaspoon lemon juice (can sub apple cider vinegar)
    • 2 tablespoons extra virgin olive oil
    • Salt
    • Freshly ground black pepper
    • 1/4 cup freshly grated Parmesan cheese (optional)

    Method

    1 Preheat oven to 400°F.
    2 Prep the Brussels sprouts: Place the trimmed Brussels sprouts in a large bowl. Toss with garlic and lemon juice. Toss the sprouts with olive oil to coat them well.
    Spread the Brussels sprouts out in a large cast iron frying pan or roasting pan in a single layer with plenty of space between them. Sprinkle generously with salt (at least half a teaspoon) and a few turns of black pepper.
    3 Roast in oven: Put the sprouts in oven on the top rack, roast for 25-30 minutes, stirring the sprouts about halfway through the cooking.
    Adjust the timing depending on the size of the sprouts and your particular oven. When the sprouts are ready, they should be nicely browned and some of the outside leaves crunchy. The interior should be cooked through, so that the sprouts are easily pierced with a fork.
    If the sprouts look like they are getting too browned (they should be well browned, not burnt), move them to a lower rack or lower the heat.
    If after cooking for 30 minutes the sprouts aren't browned enough, put them under the broiler (or increase the heat to 500°F) for 5 minutes.
    4 Sprinkle with Parmesan: Toss with Parmesan (if using) and add more salt to taste to serve.
    from Simply Recipes ~ https://www.simplyrecipes.com/recipes/roasted_brussels_sprouts/